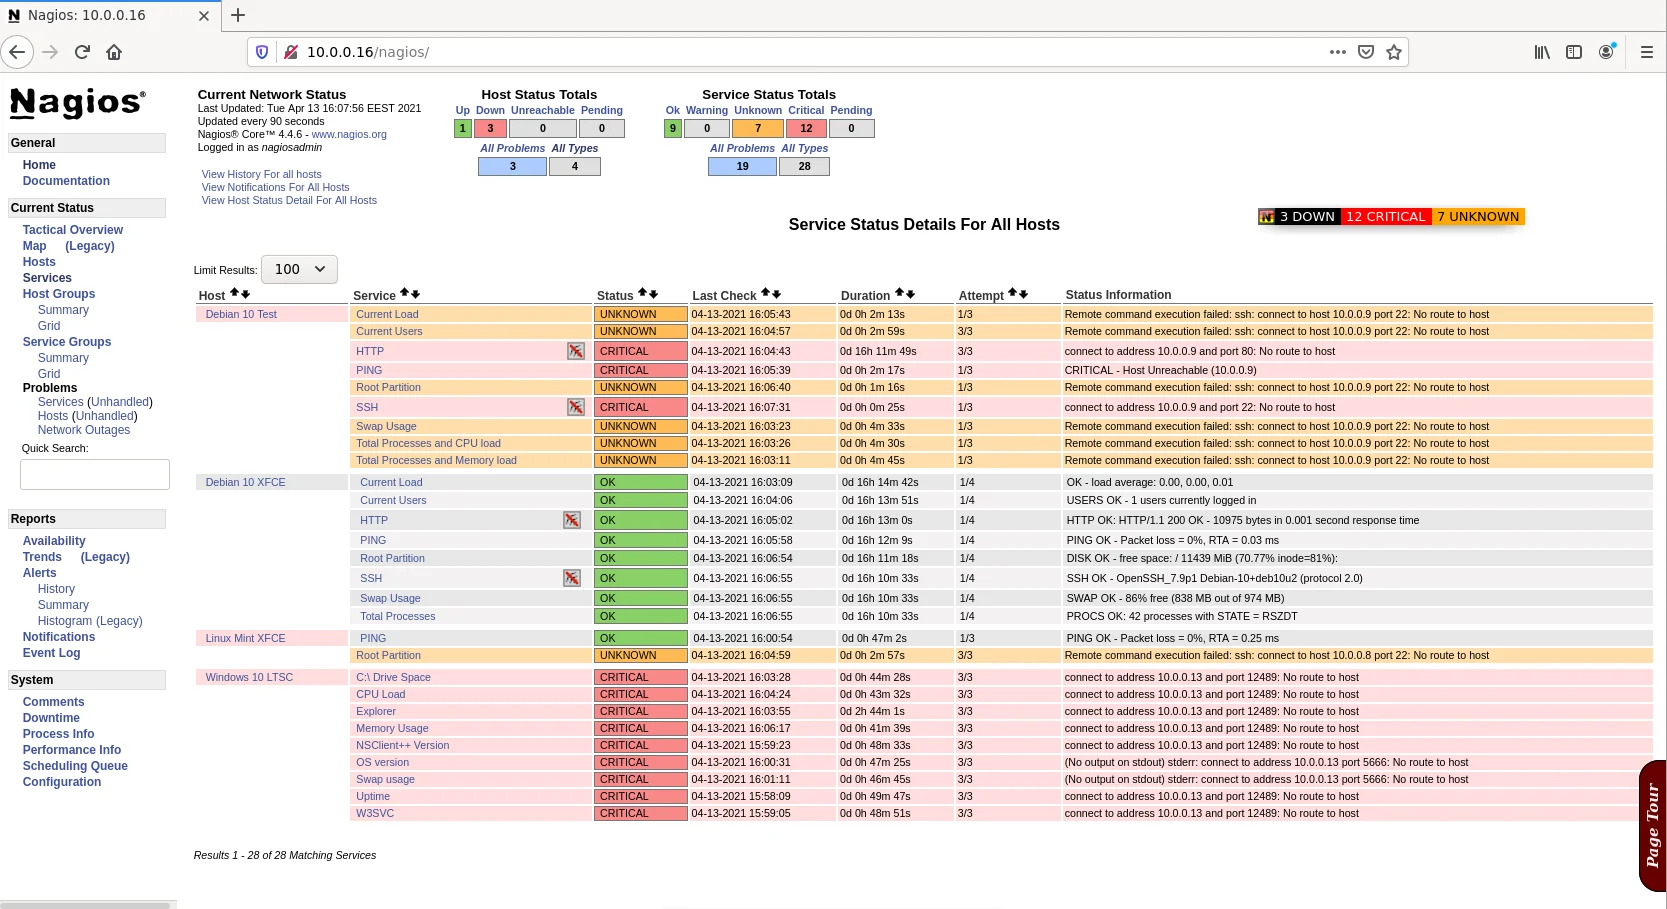
Nagios. Що нового за 10 років.

Розгортав недавно подивитися що воно за Zabbix, який зараз використовують для моніторинга у кожному ломбарді й наливайці, якщо чесно то якось не зайшло. Надумав от подивитися що там нового в Nagios, який останній раз розгортав уже давненько.
Отже для не знайомих з Nagios.:
Nagios provides monitoring of all mission-critical infrastructure components including applications, services, operating systems, network protocols, systems metrics, and network infrastructure. Hundreds of third-party addons provide for monitoring of virtually all in-house and external applications, services, and systems.
Дивимось на github що там зараз за версія актуальна. На даний момент це 4.4.6.
Встановлювати будемо на останній на даний момент Debian.
Для початку оновлюємо систему та доставляємо необхідні залежності, сервер збиратимемо з вихідного коду.
sudo apt update && sudo apt upgrade
sudo apt install wget unzip vim curl openssl build-essential libgd-dev libssl-dev libapache2-mod-php php-gd php apache2
Перший етап - ліпимо сам Nagios Core:
export VER="4.4.6"
curl -SL https://github.com/NagiosEnterprises/nagioscore/releases/download/nagios-$VER/nagios-$VER.tar.gz | tar -xzf -
cd nagios-$VER
./configure
sudo make all
sudo make install-groups-users
sudo usermod -a -G nagios www-data
sudo make install
sudo make install-daemoninit
sudo make install-commandmode
sudo make install-config
sudo make install-webconf
sudo a2enmod rewrite cgi
sudo systemctl restart apache2
sudo make install-exfoliation
Створюємо користувача для веб-консолі
sudo htpasswd -c /usr/local/nagios/etc/htpasswd.users nagiosadminЗа аналогією з сервером ставимо плагіни:
cd ~/
VER="2.3.3"
curl -SL https://github.com/nagios-plugins/nagios-plugins/releases/download/release-$VER/nagios-plugins-$VER.tar.gz | tar -xzf -
cd nagios-plugins-$VER
./configure --with-nagios-user=nagios --with-nagios-group=nagios
make
sudo make install
Хе-хе, чомусь check_nrpe вже немає в базовому наборі. Також прикручуємо, пригодиться:
cd ~/
VER="4.0.3"
curl -SL https://github.com/NagiosEnterprises/nrpe/releases/download/nrpe-$VER/nrpe-$VER.tar.gz | tar -xzf -
cd nrpe-$VER
./configure --with-nagios-user=nagios --with-nagios-group=nagios --enable-command-args --disable-ssl
make check_nrpe
sudo make install
Перевіряємо чи нормально встановилися конфіги, в подальшому перевіряємо цією командою файли після внесення змін, перед перезапуском сервера:
sudo /usr/local/nagios/bin/nagios -v /usr/local/nagios/etc/nagios.cfgНарешті додаємо до автостартуючих сервісів і запускаємо nagios:
sudo systemctl enable --now nagiosНа даному етапі ми отримали готовий сервер моніторингу доступ до якого можна отримати з веб-браузера за адресою http://localhost/nagios або http://наш_ір/nagios.
Якщо маємо фаєрвол то треба дозволити порти для http, https та ssh.
Далі все стандартно:
- /usr/local/nagios/etc/nagios.cfg - основний файл конфігурації
- /usr/local/nagios/etc/object/*.cfg - шаблони для моніторингу різного заліза і софту, які підключаються у nagios.cfg
Моніторимо Windows. NSClient++.
- Тепер треба встановити й налаштувати клієнт, зберегти файл %programfiles\NSClient++\nsclient.ini%, встановити клієнти на всі необхідні ПК, розпихати на них цей файл конфігурації та перезапустити службу nscp
- Перший раз установку розумно провести взятим з сайту інсталятором, ну а можна і через chocolatey і налаштування вже прямо у файлі конфігурації правити. Буде щось таке:
# If you want to fill this file with all available options run the following command:
#   nscp settings --generate --add-defaults --load-all
# If you want to activate a module and bring in all its options use:
#   nscp settings --activate-module <MODULE NAME> --add-defaults
# For details run: nscp settings --help

; in flight - TODO
[/settings/default]
password = nagiosadmin
allowed hosts = 10.0.0.9, 10.0.0.13

; in flight - TODO
[/settings/NRPE/server]
verify mode = none
insecure = true
use ssl = false
allow arguments = true

; in flight - TODO
[/modules]
CheckNSCP = enabled
CheckDisk = enabled
WEBServer = enabled
CheckSystem = enabled
NSClientServer = enabled
NRPEServer = true
password = nagiosadmin - пароль для доступу до служби, його ж треба прописати на сервері Nagios Core у файл /usr/local/nagios/etc/objects/commands.cfg до шаблону команди nt_check
...
command_line    $USER1$/check_nt -H $HOSTADDRESS$ -p 12489 -s nagiosadmin -v $ARG1$ $ARG2$
...
allowed hosts = 10.0.0.9, 10.0.0.13 - хости що мають доступ до сервісу. 10.0.0.9 - мій сервер nagios, 10.0.0.13 у даному випадку це ПК на якому встановлено сервіс і також піднятий веб-сервер для доступу до nscp(WEBServer = enabled ) вцілому особливого смислу в цьому нема коли починаємо нормально розбиратися в конфігурації ini-файлу.
CheckDisk = enabled , CheckSystem = enabled - дозволяють моніторити базові системні задачі: використання диску, пам’яті, завантаження процесора, стан служб, запущені процеси і т.п.
CheckNSCP = enabled - така собі досить декоративна служба, перевіряє версію встановленого nsclient
NSClientServer = enabled - запускаємо сам nscp-сервер.
- Можна придумувати велосипед чи намагатися зробити через GPO, але наш підхід - ansible. Одна простенька роль і все готово.
ansible\roles\nsclient\tasks\main.yml
---
    - name: Install NSClient++
      win_chocolatey:
        name: nscp
        state: present

    - name: Copy config file
      win_copy:
        src: files/nsclient.ini
        dest: C:\Program Files\NSClient++\nsclient.ini
        backup: yes

    - name: Restart NSClient++ Monitoring Agent
      win_service:
        name: nscp
        state: restarted
ansible\playbooks\role_nscp.yml
---
- hosts: windows
  roles:
    - nsclient
і кладемо готовий файл конфігурації у ansible\roles\nsclient\files
- Якщо на сервері потестити роботу служби не вказуючи порт, то чомусь використовується 1248, а треба 12489. Тому вказуємо явно:
/usr/local/nagios/libexec/check_nt -H 10.0.0.13 -v MEMUSE -p 12489 -s nagiosadminLinux. NRPE та SSH.
Взагалі все якось ускладнилося з 2006 року, відмова від деяких ключів в існуючих плагінах та деяких плагінів вимагає додаткових рухів, а все так добре працювало з передачею даних для авторизації через банальні -u -p…
Для моніторингу ПК з *nix можна ставити nrpe-сервер на кожен, а можна моніторити через ssh стандартним плагіном check_by_ssh.
Для моніторингу по ssh треба безпарольний доступ, тому:
- Генеруємо пару ключів:
ssh-keygen -t rsaтри рази Enter. Може я щось туплю, але якщо при першому запиті задати своє ім’я для файлу то безпарольного зв’язку чомусь не виходить.
- Створюємо юзера nagios на клієнтах та копіюємо отриманий ключ:
ssh-copy-id -i ~/.ssh/id_rsa.pub nagios@10.0.0.8- Задаємо/перевіряємо права:
sudo chmod 700 ~/.ssh/authorized_keys- Дозволяємо у /etc/ssh/sshd_config даний тип авторизації:
PubkeyAutentication   Yes
AuthorizedKeysFile %h/.ssh/authorized_keys %h/.ssh/authorized_keys2- Ну і генерувати пару звичайно треба від імені nagios, від якого стартує сервер, або перекинути потім йому вміст папки .ssh і зробити власником.
Тепер збираємо на клієнті плагіни нагіоса, аналогічно як на сервері тільки ./configure виконуємо без додаткових параметрів.
Зразок файлів конфігурації з мінімальними змінами:
commands.cfg
define command {
    command_name    check_nt
    command_line    $USER1$/check_nt -H $HOSTADDRESS$ -p 12489 -s nagiosadmin -v $ARG1$ $ARG2$
}

define command {
    command_name    check_os_nrpe
    command_line    $USER1$/check_nrpe -H $HOSTADDRESS$ -2 -n -c check_os_version -a 'perf-config=*(ignored:true)'
}

define command {
    command_name    check_winswap_nrpe
    command_line    $USER1$/check_nrpe -H $HOSTADDRESS$ -2 -n -c check_swap -a 'perf-config=*(ignored:true)'
}

define command {
    command_name    check_disk_ssh_root
    command_line    $USER1$/check_by_ssh -H $HOSTADDRESS$ -C "/usr/local/nagios/libexec/check_disk -w 30% -c 20% -p /"
}

define command {
    command_name    check_users_ssh
    command_line    $USER1$/check_by_ssh -2 -H $HOSTADDRESS$ -C "/usr/local/nagios/libexec/check_users -w 3 -c 5"
}

define command {
    command_name    check_procsCPU_ssh
    command_line    $USER1$/check_by_ssh -2 -H $HOSTADDRESS$ -C "/usr/local/nagios/libexec/check_procs -w 20% -c 50% --metric=CPU"
}

define command {
    command_name    check_procsMEM_ssh
    command_line    $USER1$/check_by_ssh -2 -H $HOSTADDRESS$ -C "/usr/local/nagios/libexec/check_procs -w 10000000 -c 3000000000 --metric=VSZ"
}

define command {
    command_name    check_load_ssh
    command_line    $USER1$/check_by_ssh -H $HOSTADDRESS$ -C "/usr/local/nagios/libexec/check_load -w 5.0,4.0,3.0 -c 10.0,6.0,4.0"
}

define command {
    command_name    check_swap_ssh
    command_line    $USER1$/check_by_ssh -H $HOSTADDRESS$ -C "/usr/local/nagios/libexec/check_swap -w 20 -c 10"
}
linux.cfg
###############################################################################
#
# HOST DEFINITION
#
###############################################################################
define host {
    use                     linux-server            ; Name of host template to use
                                                    ; This host definition will inherit all variables that are defined
                                                    ; in (or inherited by) the linux-server host template definition.
    host_name               Debian 10 Test
    alias                   VBox Debian 10 Test
    address                 10.0.0.9
}

define host {
    use                     linux-server            ; Name of host template to use
                                                    ; This host definition will inherit all variables that are defined
                                                    ; in (or inherited by) the linux-server host template definition.
    host_name               Linux Mint XFCE
    alias                   VBox Linux Mint XFCE
    address                 10.0.0.8
}


###############################################################################
#
# HOST GROUP DEFINITION
#
###############################################################################
define hostgroup {

    hostgroup_name          linux-servers           ; The name of the hostgroup
    alias                   Linux Servers           ; Long name of the group
    members                 Debian 10 Test,Linux Mint XFCE               ; Comma separated list of hosts that belong to this group
}


###############################################################################
#
# SERVICE DEFINITIONS
#
###############################################################################
# Define a service to "ping" the machine
define service {

    use                     generic-service           ; Name of service template to use
    host_name               Debian 10 Test,Linux Mint XFCE
    service_description     PING
    check_command           check_ping!100.0,20%!500.0,60%
}

# Define a service to check the disk space of the root partition
define service {

    use                     generic-service           ; Name of service template to use
    host_name               Debian 10 Test,Linux Mint XFCE
    service_description     Root Partition
    check_command           check_disk_ssh_root
}

# Define a service to check the number of currently logged in users
define service {

    use                     generic-service           ; Name of service template to use
    host_name               Debian 10 Test
    service_description     Current Users
    check_command           check_users_ssh
}

# Define a service to check the number of currently running procs and CPU load
define service {

    use                     generic-service           ; Name of service template to use
    host_name               Debian 10 Test
    service_description     Total Processes and CPU load
    check_command           check_procsCPU_ssh
}

# Define a service to check the number of currently running procs and Memory usage
define service {

    use                     generic-service           ; Name of service template to use
    host_name               Debian 10 Test
    service_description     Total Processes and Memory load
    check_command           check_procsMEM_ssh
}

# Define a service to check the load
define service {

    use                     generic-service           ; Name of service template to use
    host_name               Debian 10 Test
    service_description     Current Load
    check_command           check_load_ssh
}

# Define a service to check the swap usage
define service {

    use                     generic-service           ; Name of service template to use
    host_name               Debian 10 Test
    service_description     Swap Usage
    check_command           check_swap_ssh
}

# Define a service to check SSH
define service {

    use                     generic-service           ; Name of service template to use
    host_name               Debian 10 Test
    service_description     SSH
    check_command           check_ssh
    notifications_enabled   0
}

# Define a service to check HTTP
define service {

    use                     generic-service           ; Name of service template to use
    host_name               Debian 10 Test
    service_description     HTTP
    check_command           check_http
    notifications_enabled   0
}
windows.cfg
###############################################################################
#
# HOST DEFINITIONS
#
###############################################################################
define host {

    use                     windows-server          ; Inherit default values from a template
    host_name               Windows 10 LTSC               ; The name we're giving to this host
    alias                   VBox Windows 10 LTSC       ; A longer name associated with the host
    address                 10.0.0.13             ; IP address of the host
}


###############################################################################
#
# HOST GROUP DEFINITIONS
#
###############################################################################

# Define a hostgroup for Windows machines
# All hosts that use the windows-server template will automatically be a member of this group

define hostgroup {

    hostgroup_name          windows-servers         ; The name of the hostgroup
    alias                   Windows Servers         ; Long name of the group
}


###############################################################################
#
# SERVICE DEFINITIONS
#
###############################################################################

# Create a service for monitoring the version of NSCLient++ that is installed
# Change the host_name to match the name of the host you defined above

define service {

    use                     generic-service
    host_name               Windows 10 LTSC
    service_description     NSClient++ Version
    check_command           check_nt!CLIENTVERSION
}

# Create a service for monitoring the uptime of the server
# Change the host_name to match the name of the host you defined above

define service {

    use                     generic-service
    host_name               Windows 10 LTSC
    service_description     Uptime
    check_command           check_nt!UPTIME
}

# Create a service for monitoring CPU load
# Change the host_name to match the name of the host you defined above

define service {

    use                     generic-service
    host_name               Windows 10 LTSC
    service_description     CPU Load
    check_command           check_nt!CPULOAD!-l 5,80,90
}

# Create a service for monitoring memory usage
# Change the host_name to match the name of the host you defined above

define service {

    use                     generic-service
    host_name               Windows 10 LTSC
    service_description     Memory Usage
    check_command           check_nt!MEMUSE!-w 80 -c 90
}

# Create a service for monitoring C:\ disk usage
# Change the host_name to match the name of the host you defined above

define service {

    use                     generic-service
    host_name               Windows 10 LTSC
    service_description     C:\ Drive Space
    check_command           check_nt!USEDDISKSPACE!-l c -w 80 -c 90
}

# Create a service for monitoring the W3SVC service
# Change the host_name to match the name of the host you defined above

define service {

    use                     generic-service
    host_name               Windows 10 LTSC
    service_description     W3SVC
    check_command           check_nt!SERVICESTATE!-d SHOWALL -l W3SVC
}

# Create a service for monitoring the Explorer.exe process
# Change the host_name to match the name of the host you defined above

define service {

    use                     generic-service
    host_name               Windows 10 LTSC
    service_description     Explorer
    check_command           check_nt!PROCSTATE!-d SHOWALL -l Explorer.exe
}

# Create a service for monitoring the OS version
define service {

    use                     generic-service
    host_name               Windows 10 LTSC
    service_description     OS version
    check_command           check_os_nrpe
}

# Create a service for monitoring swap
define service {

    use                     generic-service
    host_name               Windows 10 LTSC
    service_description     Swap usage
    check_command           check_winswap_nrpe
}
Об’єм робіт в основному зведеться до забою в конфіги серверів і служб для моніторингу, при великій кількості може бути дуже довго і дуже не цікаво.
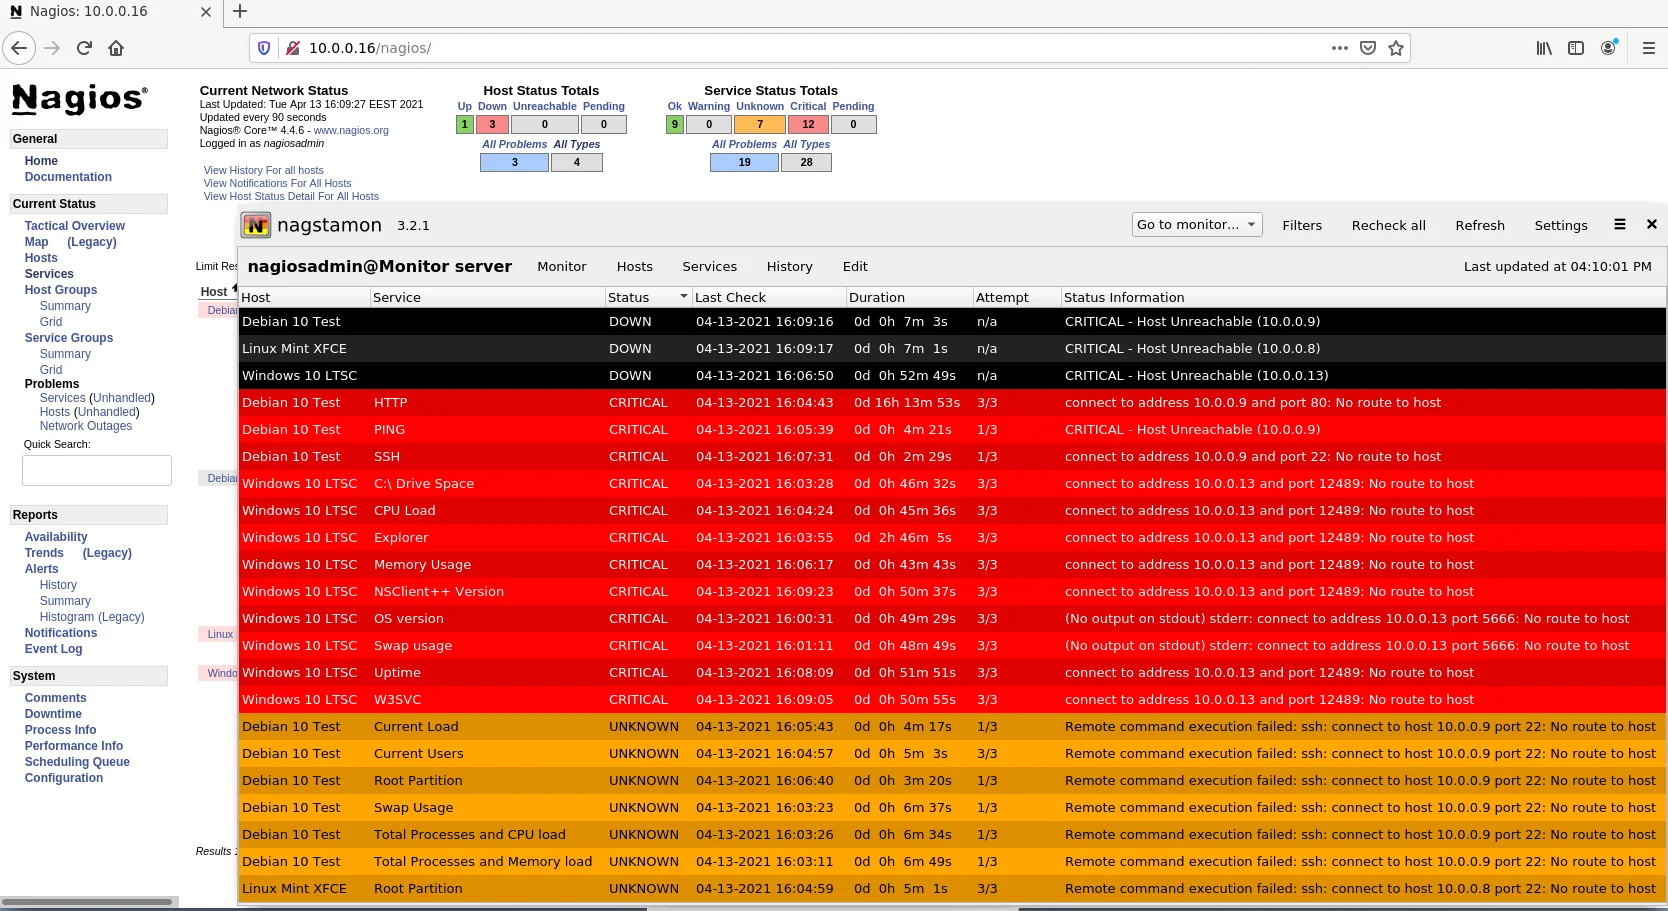
Далі ставимо nagstamon і можемо моніторити.

